Monday, October 16, 2017

Why interrupt your students when you can whisper?


Whisper by EdTech Team
Have you ever wanted to send a message to a student or group of students in class, but didn’t want to interrupt what they are doing shouting across the room?  Whisper instead!


The new chrome extension from EdTech Team allows you to send a message to an entire class or selected students using your google classroom class rosters.  Even if the students are not logged onto the computer, once they log into chrome, they will see a notification from you.  If they are logged in when you send the message, a small notification will appear on their screen.


Best of all, you don’t have to stop the entire class to call out a message!
Oh wait! There’s more!  

Whisper sends the teacher an email message with the details of the message so that you have a record of the message that was sent.  This is great for students that have a consistent habit of off task behavior. If you want to focus on the positive, you can send messages to keep track of good behavior too.
To install it in chrome:
  • Go to the chrome web store, search for whisper edtech team.  Or go to this link.
  • Install the extension.  Your students need to install it as well.
  • The extension icon looks like this.  
  • Click on the extension and follow the directions to login as a teacher and verify and allow it to use your google classroom rosters. Have your students click on the extension and login as a student.
To use it in class:
  • Log into your chrome browser.  Click on the extension in your menu bar.
  • A pop up window appears with your list of Google Classroom classes.
Sends an email to you with a copy of the message and who it was sent to for your records!


Monday, October 9, 2017

Digital Anatomy Classroom


File:Olympus CH2 microscope 1.jpg - Wikimedia Commons
I love finding new ways to incorporate technology into my classes.  When I do use a new piece of technology, I always ask myself a few questions.  One question is always - "is it something that I can now do better or couldn't do before without the technology?"  If I cannot say yes, then I rethink the option.  
I asked myself this question again recently when I had purchased digital microscope cameras for my anatomy class.  When my students use the microscope in class, it is a skill that always needs to be relearned by most because they haven’t used the microscope in at least three years.  The other issue with using microscopes is that only one student can look through the eyepiece at a time. So, inevitably, one student in the pair isn’t doing anything while the other is looking for the specimen.  Additionally, students complain that their eyes get tired and it is often hard to see through the eyepieces.  Finally, I have to squeeze in between lab desks in order to look through the scope in order to offer assistance and check to see if they have found the right image, even though they have a sample on the projector.  We won’t even discuss how hard it is to get the students to accurately draw and label what they saw through the scope!  It has always seemed pointless to me because the drawings do not even resemble what they were supposed to look at.
Free illustration: Question Mark, Question, Help - Free Image on ...

What can I do to make it easier?  This has been an issue for years.
Free illustration: Icon, Head, Profile - Free Image on Pixabay ...

   Enter the digital microscope camera
        connected to a chromebook!
Class savior!  I had one camera as a trial the last two years and it seemed like it would be a viable option.  However, the model I found was expensive.  So, getting enough for all of my students was tough.  In the meantime, I had students take pictures with their phones through the eyepiece to share with me and others.  It wasn’t the solution.  However, this year, I found an inexpensive digital microscope imager that can replace the eyepiece on my microscopes and connect to my chromebooks via USB cable.  We can then use the camera app on the chromebook to view the image, save it and then annotate it in google slides.  


Wow.  Game change for me and even more so for my students.  The live feed from the microscope is displayed on the chromebook screen, so everyone in the group can help with focusing and deciphering what they are looking at.  Being able to save the image and annotate it in google slides is also critical.  Now, students can use the real images from class to study for a test and I can see right away if they are looking at the right section of the slide.  

Copy of colorblind image.PNG
Last year, I also realized another benefit.  I had a student that was color blind.  He couldn’t tell the difference between the shades of pink commonly used in microscope tissue stains.  
But with the digital microscope camera, we could apply filters or use the image options in google slides to recolor the image with a color scheme that he could see.  What a lifesaver for my student who normally felt left out and frustrated.
Why haven’t I found these before?  Why did it take so long to get a solution?  I have no idea, but I’m glad I found them for one main reason - my students.  Once they got the hang of which app to use, switching from the web camera to the microscope camera and taking focusing with the microscope, they all really like it.  I even had one student proclaim - “I’ve never been able to use a microscope, but this way, I actually can do this!”  Thank you!  This is why I do what I do.  It’s for my students.  It’s not about making it difficult.  It’s all about making it easier for my students and assist their learning.  

Now to find another revolutionary tool or hack for my class.  I hope this helps someone else out.

Putting my summer work into practice with HyperDocs and more

This summer felt like a whirlwind of teacher trainings and workshops.  We met, connected and reconnected with so many educators that are eager to transform their teaching this year.  It was an exciting summer to say the least. 

One part of my summer included participating in the MasterClass tour from

EdTechTeam.  I attended the NYC tour with a team from my school that was organized by my husband, Brian Cauthers.  As a team, we learned so much from the authors that guided us through a tech journey throughout the day.  We were fortunate that our tour included a booksmash that included Dive Into Inquiry, HyperDocs Handbook and Google Infused Classroom.  I had read all three books prior to attending and loved them all.  The authors that joined us were so approachable and helpful throughout the day, providing insight on ways to incorporate technology meaningfully into our classes.  

It was great to see how the room varied from newcomers to tech integration to leaders, such as our friend, Laurie Guyon.  Everyone shared and helped out to create lessons that we could bring back and implement this year, which is priceless!  


One of my favorite things that I created this summer with my assistant superintendent, Dr. Adam Pease, is a HyperDoc for our mandated training that we do in school every year.  (Yes, I'm lucky to have an administrator that is not only supportive, but also innovative and constantly learning new things with us.)  I'm not sure how your school does it, but our mandated training on blood borne pathogens, child abuse reporting and the others is just painful.  We watch videos that appear to have been created in the 1970s and just click through each step until we have to take a quiz at the end.  Once we complete all of them, we print our certificate to prove completion and it's over.  Boring.  This year will be different.  Our teachers will have a choice!  This has been a recurring theme in our district since last year - giving students and teachers voice and choice.  As a result of our concerted effort, we came up with a HyperDoc that does just that.  Gives teachers a choice.  They can do the same old boring version or the new spruced up version! 

Here's a preview of what it looks like (click here for a larger view)


The new version serves two purposes: 
  1.  Get staff to think critically about the content while making their learning visual.
  2. Help the staff to use technology tools that they can also implement in their classrooms this year.  
It seems like this should have been done long ago.  With the HyperDoc format, it is all packaged in one clean slide for all six topics.  Teachers will experience:
  • posting in a shared document
  • creating a slide in a shared slide deck
  • posting a video on Flipgrid
  • answering questions in a google form with embedded videos
  • posting responses in a shared Padlet
  • completing questions about a video using EdPuzzle
In addition to simply completing our training requirement, the administrators and clinical staff will now have responses from teachers that they can use for future discussions and training throughout the school year.  


So far, we have tested our HyperDoc with our administrators and our tech leaders with amazing feedback. We have tweaked it slightly based on their feedback and cannot wait to roll it out with the full staff next week.  One simple thing we learned so far is that even though we have done the training every year, most of our testers did not know who the Title 1 officers were in the district.  We have never received feedback like that from our previous format.  Once it is complete, I'll post again with some feedback on how it was received by the staff.  Wish us luck!

Thanks for learning with us!
--Jen


Wednesday, August 2, 2017

Shout Key for shortened URLs on the fly


Need a temporary shortened URL on the fly that is easy?

You are at a workshop and forgot to link to a resource.  You don't want to have to send an email.  Sometimes, setting up a bit.ly can be a pain with lots of long letters.  Goo.gl uses combinations of letters, caps and numbers.  Then you need someplace to display the link or zoom in on it.  You also do not care about tracking clicks or reusing the link.

   So what do you do?

   Well, I found another solution to the dilemma.  Today, thanks to some browsing
   on 
social media, I discovered a new to me URL shortener called Shout Key.  


The concept is quite simple.  Go to http://www.shoutkey.com.  Paste the URL you want to get a shortened link for.  Another feature, is that the link expires.  You can set it from a little as 5 minutes to 24 hours.  

The link that is created is a simple word instead of random combinations of letters, numbers and symbols.  

For example, your link would be: 

 http://www.shoutkey.com/piece.  

Your participants can type shoutkey.com/piece without having to type the http://www. portion of the URL.  

Now that is pretty handy in my opinion.  

I wouldn't use this for everything since I occasionally like to track clicks to see if our staff looks at a resource we send out or to see how many participants from a workshop went to your links.  But, on the fly, this is great.  What a simple solution.

I hope you find this helpful. 

Jen


Friday, July 21, 2017

Breakthrough classrooms

Breakthrough Classrooms

This summer, I was lucky enough to take part in a training at my school called breakthrough classrooms. The goal of the course is to learn how to adapt my classroom for the changing learning styles of our current students.  My ultimate goal is to transform my instruction and not just make a minor change for the sake of change.  I want my instruction to enrich their curiosity for knowledge. 

Over the last couple of years, I have begun my transformation by flipping my classroom.  I took my major "lectures," videotaped them, and posted them on YouTube for my students and the world to use.  Having the students watch the videos instead of me lecturing opened up class time for the students to work on project based learning and sessions to help students that are struggling or further advancement.  

As a result of flipping my classroom, my classroom is no longer set up in rows of desks with students listening to the teacher standing at the front of the room.  It's busy.  It can be chaotic.  Students are working on different pieces of work at different times.  But it works for me.  Unfortunately, some don't always understand that my chaotic classroom is still productive.  

More importantly, my physical space needed to change.  I started small with letting my students rearrange the classroom space as they needed.  This year, I plan to do more with additional flexible seating.  My school has also agreed to get rid of my old connected desks and get me some new ones that are a bit more flexible. I don't want the district to spend a fortune, but I want something that is more functional.

The last thing I hope to establish is a bit of mindfulness in my daily routine to benefit not only me, but my students as well.  I know it is something minor in many cases, but in our society, our brains are working at full speed and we are in a state of fight or flight almost constantly.  We just never stop.  I notice sometimes that I just sit down and sigh.  I need to remember to sit and relax and take a deep breath once in a while.  And I know my students need it as well.  They all complain about how stressed they are and how crazy things are between school, work and sports.  For the health of everyone, we should teach our students how to take a step back once in a while and declutter our brains.  It has been shown that this can actually help us to focus better on the task at hand instead of trying to multitask constantly.  I think our students will see more success in their classes if they can find a way to shut out the rest of the noise and just focus on the tasks at hand.

I am so excited to begin the new school year.  I can't wait to try out some of the new things that I learned this summer in my classes.  

For now, I am going to focus on enjoying my summer with my family day by day.

Jen


Sunday, June 11, 2017

Cool new Geo Tool we found this week for Google Sheets - Geosheets


Co-authored post from Jen Cauthers and Brian Cauthers about a Geo Tool we found this week!

File:X-office-spreadsheet.svg - Wikimedia CommonsHave ever tried to integrate Google Sheets data with a Google Map (need help with this take a look at this tutorial)?  If you have there is one critical problem with that workflow…  If the data in the sheet is continually being updated you will have to update the map to reflect the current data.  


Well, not anymore! While attempting to figure out the easiest way to do a collaborative map for a class that we are taking through EdTech Team, we found a new add-on to sheets called Geosheets!  This add-on will allow your spreadsheet data to be automatically updated to reflect real time data entry into your map.  Game changer!  Before Geosheets, auto-updating a map required a bit of programming knowledge and was just a hassle for most of us.

Geosheets at its basic level will allow you to create custom maps with simple equations in your spreadsheet.
 It will allow you to create a Google Form and when the form data is updated in the sheet, Geosheets will allow the automatic update of the map.
Some of the advanced functions in the classroom will be to create all sorts of custom maps to illustrate human impacts on global temperature, urban heat sinks, travel maps, major weather event mapping, historic events.  All of these maps will allow you to customize the map with colors, lines, and interactive features such as attaching links, pictures, and videos.

The website for Geosheets contains examples for each of the functions and tutorials on how to create maps with your data.  There is even a set of demo data for you to experiment with prior to using your own data.

Getting Started
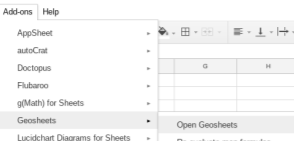
  • Install the Add-On in Google Sheets
  • Activate Geosheets in your spreadsheet

        
  • Authenticate/link your google account.
  •   

  • Create a spreadsheet with at least one column containing locations to be mapped
    (or gather your data using a Google Form):
  • Location info can be in the following formats:
    • City, State
    • Address
    • Landmark
    • Latitude, Longitude (decimals or degree minute second values)
  • Additional information to include in your spreadsheet for mapping
  • Label - label for the pin to place on the map
  • Color: A color name or hex code (e.g. #ececec) for the marker representing the given location.
  • Icon: The name of an icon to render within the marker for a given location. Allowed names are any from https://www.mapbox.com/maki-icons/, e.g. "lodging" or "rail".
  • Type: The type of the feature in this row, one of marker, circle, line, geodesic. If omitted the row is assumed to be a marker.
  • Radius: If the feature type is circle, the radius in pixels.
  • Image: The url of an image to show in the infowindow when clicking on a feature.
  • Any other attribute you add into a column will be added to the popup window when you click on the pin for that location.
If you are going to include additional information besides location, you need to include a header row with labels.

This is just the very basic type of map placing a pin at a location on the map with some labels, different pin types, colors, etc.   Geosheets is much more powerful for mapping than any other tool I have seen.  You can also create maps that will use your data and lookup information based on the values or assign values for mapping based on the data provided.
Examples:
  • Lookup latitude, longitude values for a location
  • Heatmap: creates a heatmap from the locations and assigns intensities based on the data
    • =GEO_HEATMAP(locations:range, label)
  • Color: color codes pins - you can provide your own color or Geosheets helper functions can assign colors
Generates distinct colors for each unique value in a column. Use this when you're trying to color-code discrete values like strings.

To see samples of the main types of maps you can create with Geosheets with their interactive features, please visit their sample page here.  

For our class, we wanted students to collect data from others around the world about the plants and animals living in their habitat so that our classes could guess what type of habitat they live in. We created a form here to collect the data from classes around the world with the data and also a picture of the habitat and called it Guess the Habitat.

The data is sent to a Google Sheet where we use the Add-On to create a map.  The questions in the form drive the labels for the columns so that the formula to create the map is quick.  For our example, we collected:
  • Location
  • Flora: plants found in the habitat
  • Fauna: animal found in the habitat
  • Image:  URL for a picture of the habitat
  • Email: so we can collaborate with the respondents

Here’s a set of sample data:

Once you have at least a shell for your data, you need to enter the formula to create your map.

The Add-On helps you to build your formula.  


In a cell in your spreadsheet, start typing the beginning of your formula:
=Geo_Map(range, “title”)

  • Range - range of cells for your data or column - you can click and drag in your sheet
  • Title - title for your map

You will get a preview of your map on the right side of your sheet and a link will be inserted into the cell that you can copy and paste into an email, website, etc. or you can get an embed code.  Here’s a sample map for our project.  

The one downside of the Geosheets is that in the free version you are only able to have 5 active maps and 200 responses per day.  For most of us, this is plenty.  For high end users, you would need a paid plan, which is $19.99/month which is too costly for educational use.

Overall, this is an amazing tool to create fully interactive maps that update in real time as data is collected.  We are so excited to use the tool in our classes next year.  We would love to hear how you use it in your classes too.

Thanks for learning with us.

Jen Cauthers and Brian Cauthers


Monday, June 5, 2017

ZSpace VR/AR demo van visits Mahopac!

Have you heard of zSpace?  

If not, you are definitely missing out on an amazing experience!  


Today, the zSpace VR/AR demo mobile van visited our middle school and high school.  We first learned about zSpace on the web and then saw a demo of it at one of our BOCES technology expos last year.  However, we did not explore the idea further due to time constraints.  Luckily, our technology department was able to secure a demo for us last week! 

The topics that zSpace offers is expanding tremendously into areas such as geography and math.    If you search their database of lessons, there are over 100 lessons for middle school science topics.  If you teach a class that covers the human body or animal models, you will be astounded at what zSpace can do.  Imagine being able to extract the blood vessels from the human brain.  Or how about being able to take apart sections of the heart?  You can do that in zSpace with ease.

When you book zSpace to come to your school for a demo, they bring a giant mobile van with all of the equipment needed for your experience. The staff oriented the students to the tools for the platform and they were off and running within about 10 minutes.  Our groups explored some of the human body systems.  The images were dynamic, realistic and even had a quiz feature.  The students were amazed at how much they could magnify an image, see details, and explore from every angle.  The glasses allow you to see the content in a 3D or augmented reality manner.  The glasses were much more natural feeling than a typical virtual reality headset that can sometimes get very hot and foggy. 

We know that the content is high level, but we were holding out on the feedback from the students. Since our group ranged from 8th graders to 12th graders, we knew if would be a good sampling.  The seniors were more skeptical.  They haven't grown up using technology in their classes, so they aren't used to it invading their classrooms.  Believe it or not, they still like paper and pen.  Afterwards, they commented that they really liked the zSpace experience to be able to get a more realistic look at the human body to prepare for dissections.  It is something they could do "once in a while, but not every day."  Perfect.  They realize that everything in moderation is a good mix.  The students still want the experience of a real dissection, not just a virtual one, but know that the virtual dissection prepares them for the real thing. 

The younger students really thought the experience was helpful to see things that they normally have difficulty viewing or testing in real life.  We also had one group of 8th graders that were able to spend about an hour in the van.  This group experienced building a circuit for a quad copter.  It was a challenge to see which team could build it the fastest and they loved it. The team work was great because the "passenger" truly helped the "driver" troubleshoot the system.  It was amazing to see how this group learned how to manage the system by the end of their hour and saw their skill level increase to a visible comfort level navigating the tools.  At the end, some students did comment that an hour was a bit tiring on their eyes but it was very fun.  

One of the highlights of the day showed just how intuitive the software is once the students get a little time to practice. After only ten minutes using the software, one of our students showed her teacher how to explore with zSpace.  Watch the video to the right to see it in action.


The zSpace trainer asked the students one question at the end of the hour, "if you could describe zSpace in one word, what would it be?"  One student shouted out immediately, "revolutionary!"  Well said.  If implemented thoughtfully, it zSpace can be a game changer in your classroom.  Students can experience and experiment with tools that are not easily used in the traditional classroom setting.  It brings content that would normally be inaccessible to everyone. 

Check out our photos and videos from the day!  Hope you enjoy.

-Jennifer and Brian Cauthers

Wednesday, May 31, 2017

Do you have a blogging buddy?

Do you have a blogging buddy?

I do!  Actually, I have four, but we'll get to that later. Thanks to Steve Wick, I was introduced to the ISTE Ed Tech Coaches Blogging Buddies group. The group was started from an idea by Jennifer Hogan's "Compelled Blogger Tribe!"

The group is designed to help ed tech coaches and tech leaders in education to share and learn from each other via their blog posts. Your blogging buddies read your blog monthly and constructively comment. Once I saw the post from Steve Wick about his blogging buddies, I knew it was what I needed to spark me to blog regularly. So, I decided to learn more about it here and sign up. The blogging buddy group is organized by Katie Siemer. I received my welcome email from Katie that day and was notified of my blogging buddies group members after a few days. The email gave me a list of everyone's name, email address, location, blog address and Twitter handle. I was so excited to see that I had people from all over the place in my group, including Mexico! Oh, wait! I don't speak Spanish. What am I going to do? Thank goodness for Google Translate!

I can't wait to share my first blog with my group, but I am nervous at the same time. What if my blog isn't on quite an amazing topic as theirs is? Luckily, the group site also has some ideas for you to write a blog about. I should get going and start thinking of some awesome ideas to share!

Happy blogging everyone.


Thursday, May 25, 2017

How to get the most out of conferences

This past weekend, I attended the Capital Region EdTech Team Google Summit in Albany, NY.  I love going to the summits because I get to meet such amazing people that have similar interests.  It is so nice to be around a large group of people that are all excited to try new things in their classroom.  I also learn so much from everyone.

However, as we all know, sometimes, conferences can be overwhelming.  A summit style conference is a smorgasbord of topics that could appeal to almost anyone.  So, if you're not careful, you could leave at the end of the weekend with more ideas than you can implement in a lifetime, let alone implement effectively.  I have also found that if I try too many new ideas with my older students (juniors and seniors) they are a bit more resistant than my freshman. I think it is because they aren't used to using technology in their classes quite as much.  

So, here are my top tips to make the most out of attending a conference:


  1. Pick a theme - attend sessions that are centered around a theme that you can work with such as writing tools or video tools.  That will make it easier to implement in your class since the tools will theoretically work together.
  2. Choose your favorite - if you cannot stick to a theme, choose your favorite app or tool from the conference and try that out first.  Get good at it and let your students get comfortable using it before testing out another idea.  This will make it seem less like a technology carnival in your classroom.
  3. Start small - pick one lesson to implement a tool in and see how it goes.  Don't try to
    revamp an entire two week unit with a tool you have never used before.  If you start small testing it out, then hopefully if it does not go well, you can make small adjustments before using it again.  More importantly, it did not impact as many days of instruction and will be easier to fix. 
I hope this helps you to get some ideas on how to make the most of your education conferences that you attend in the future or if you are looking back at your notes from a recent conference.